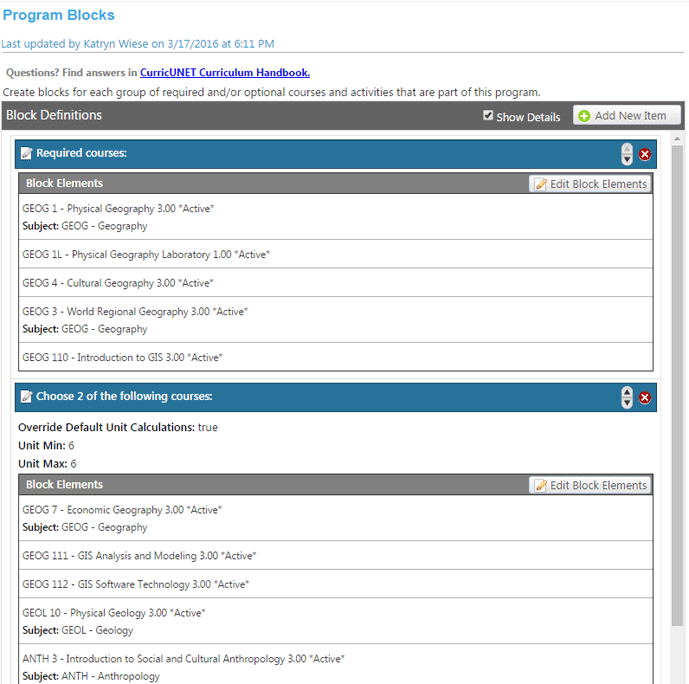
The above screen shows how you enter program requirements. Each requirement is an individual element inside a block. First create your blocks, then edit them to add your elements.
- Blocks -- groupings of requirements
Title these in a way that will make it clear to students what is necessary and what is optional. Use block titles that match current practice. (See examples at end of page.) - Elements -- individual courses or non-course requirements within a given block.
Actions:
- Click Add New Item to add a new block.
- Click on blue banner for a given block to edit the details of that block (including unit overrrides and titles).
- Click on the X symbol at the far right of a block banner to DELETE a block.
- Click on the UP and DOWN arrows at the far right of a block banner to move blocks up and down in their order.
- Click Edit Block Elements to edit elements within a particular block.

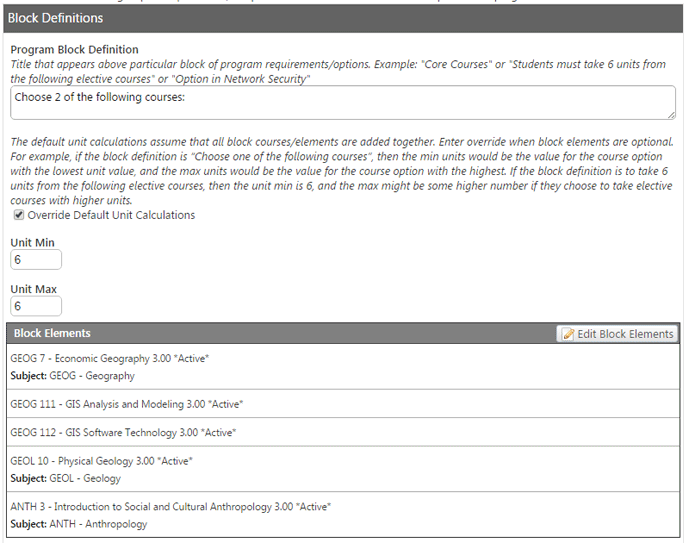
The above screen shows how you create a new program block (if you clicked Add New Item on previous screen). You use this same screen to edit an existing block (which you accessed by clicking on the blue banner title of the block in the previous screen).
1. In the Definition field, enter the title for your block (see above suggestions).
2. CurricUNET automatically calculates units for the block based on the elements you choose to fill it. Click the Override Default Unit Calculations checkbox if you do NOT want the unit totals to be automatically calculated by CurricUNET.
3. Click Save to save your work.

The above screen shows you the Program Block Elements for a given program (you access this screen when you click on Edit Block Elements for a given block in the Program Block screen).
Actions:
- Click Add New Item to add a new element.
- Click on blue banner for a given element to edit its information.
- Click on the X symbol at the far right of an element banner to DELETE an element.
- Click on the UP and DOWN arrows at the far right of an element banner to move elements up and down in their order.
- Click Done to return to Blocks screen.

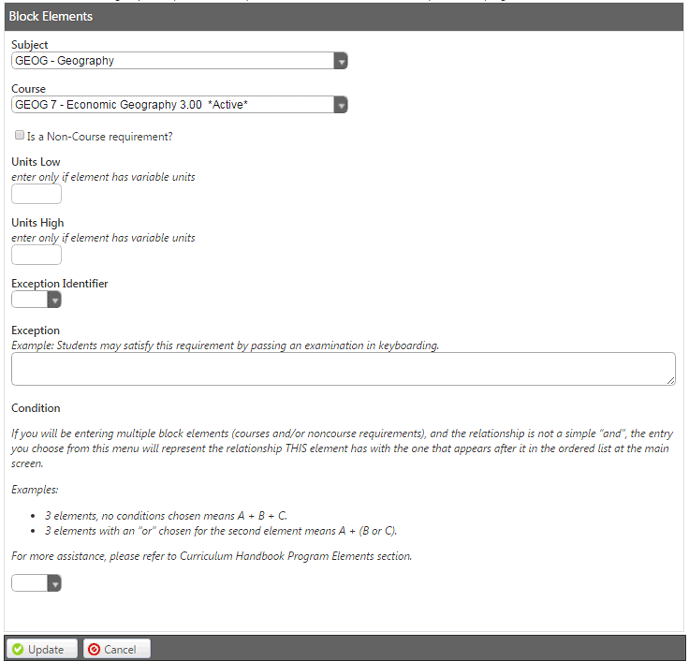
The above screen is where you edit or enter a new element for a give block (you access this screen when you click on Add New Item or click on the blue banner for a given element).
1. Choose a course subject and title. Choose only Active or Approved course, not In Review.
2. If you are entering a noncourse requirement, click on the checkbox and a new field appears that lets you describe the new requirement (it will also hide the course menu).
3. ONLY if a course requirement has variable units should you enter those values in the Units Low and Units High fields.
4.ONLY if a particular requirement has an exception, choose the appropriate exceception from the Exception Identifer drop-down menu and then enter the text you want to appear in the Exception field.
5. The default for block elements is that they are all treated as "and". If you have a more complicated relationship between elements, then use the drop-down menu for Condition to indicate how the requirement that appears AFTER this requirement will relate. Example: Add "or" if the next element can be taken instead of this one.
If you need any help here, contact curricunet@ccsf.edu.
Curriculum Committee Notes
Use block titles that match current practice. Be sure to add a “:” at the end. Examples:
- Required courses:
- Choose 2 of the following programming courses:
- Choose 6 units from the following electives:
- Recommended additional coursework (*avoid using if possible*)
Avoid pulling “In Review” classes into programs. Pull in only the “Active” or “Approved” classes.
If students have options between multiple don’t use “or”s as conditions between course. Instead, use separate blocks with min/max units for the block. Example:
Choose one of the following math courses:
min/max units = 5 units;
ECON 5
MATH 80
Use “ands” between courses only if student have to choose a course combination.Example:
Choose one of the following course or course combinations:
Min/max units = 4 units
BIO 9 (4 units)
GEOG 1 (3 units)
and
GEOG 1L (1 unit)
If your program has multiple OPTIONS, these need to be combined into the same block to total correctly. Example:
Choose one of the following options:
(min/max = 5/8)
OPTION 1
OCAN 1 (3 units)
OCAN 1L (2 units)
OPTION 2
GEOG 1 (3 units)
GEOG 1L (1 unit)
GEOG 41A (1 unit)
GIS 110 (3 units)
*Enter OPTION language as "non-course requirement". You can also add a double-line to your final report between the options by adding a blank "non-course requirement" element.
